От халепа... Ця сторінка ще не має українського перекладу, але ми вже над цим працюємо!

Effective forms: using the Material UI and React Hook Form utilities

Ihor Belehai
/
Front End Developer
8 min read
We return to our series of articles where we learn about building forms with React, Typescript, React Hook Form, Material UI, and Yup. In the previous article, we learned how to implement basic validation with Yup and React Hook Form. This time, we’ll enhance the look and feel of the form with added and integrated Material UI and React Hook Form utilities and improve our existing Yup validation.
Quick navigation between related articles:
- Building Effective Forms with React Hook Form, Typescript, Material UI, and Yup
- Effective forms: form validation with Yup, React Hook Form, and Typescript
- Effective forms: using the Material UI and React Hook Form utilities

And again, if you want to see the final source code of the series, visit the following link.
As always, you can also play with the demo.
Contents:
- Getting started
- Building the TextInput component
- Getting along with the SelectInput component
- Integrating the DateInput component
- Establishing the CheckboxInput component
- Use newly created inputs
- Improving form validation
- Conclusion
Getting started
If you want to brush up on form creation and validation, we recommend you read the related articles from our series. This article will be helpful if you wish to dive deeper into using the Material UI and React Hook Form utilities.
First of all, install Material UI:
npm i @mui/material
Quick disclaimer: this article won’t focus on explaining Material UI. If you want to learn about it in detail, please find an appropriate guide relevant to your level of knowledge.

Building the TextInput component
Remember, in the previous article, we used register to register native HTML inputs in your form?
In the real world, you will always have to deal with external UI components, such as Material UI, AntD, and so on, and you cannot integrate them into React Hook Form with register.
However, React Hook Form provides Controller and useController to integrate such components easily. Let me show you how to do it.
Let’s start with creating a separate component TextInput form for our inputs of text type:
- Create a new file components/TextInput.tsx
- Make some imports:
import React from 'react';
import { TextField } from '@mui/material';
import { Controller, useController, UseControllerReturn } from 'react-hook-form';
3. Describe input props:
export interface InputProps {
  name: string;
  placeholder?: string;
  label?: string;
}
4.Create a component:
export const TextInput = (props: InputProps) => {
  return (
    <TextField
      variant="outlined"
      placeholder={props.placeholder}
      label={props.label}
    />
  );
};
At this point, this component does nothing. So let’s change it.
Getting control of the TextInput component
So, let’s break down the process.
- Basically, Controller and useController are two different ways to do the same thing. To use either of them, we need to have a control object which belongs to our form created via useForm. There are two ways to do this:
- Pass it as a prop to the TextInput component:
import { Control } from 'react-hook-form';

export interface InputProps {
  name: string;
  placeholder?: string;
  label?: string;
	// add a new prop
	control: Control
}

// Example usage:
const form = useForm(...)
<TextInput control={form.control} />
Get it from the form context with useFormContext:
import { useFormContext } from 'react-hook-form';

// ...
const { control } = useFormContext();
We’re done with the first method.
Now, let’s use the second way. But remember, you should always wrap your form with FormProvider to be able to use useFormContext. Our TextInput component at this stage:
export const TextInput = (props: InputProps) => {
  const { control } = useFormContext();

  return (
    <TextField
      variant="outlined"
      placeholder={props.placeholder}
      label={props.label}
    />
  );
};
Now the Controller is an object of type UseControllerReturn containing the following properties:
{
	field: {
		onChange: (...event: any[]) => void;
    onBlur: Noop;
    value: UnpackNestedValue<FieldPathValue<TFieldValues, TName>>;
    name: TName;
    ref: RefCallBack;
	},
	fieldState: {
		invalid: boolean;
    isTouched: boolean;
    isDirty: boolean;
    error?: FieldError;
	},
	formState: {
		isDirty: boolean;
    dirtyFields: FieldNamesMarkedBoolean<TFieldValues>;
    isSubmitted: boolean;
    isSubmitSuccessful: boolean;
    submitCount: number;
    touchedFields: FieldNamesMarkedBoolean<TFieldValues>;
    isSubmitting: boolean;
    isValidating: boolean;
    isValid: boolean;
    errors: FieldErrors<TFieldValues>;
	}
}
We can use some of them to bind our input to our form:
3. Bind input with the form with controller:
<TextField
  variant="outlined"
  placeholder={props.placeholder}
  label={props.label}
	// binding onChange to onChange provided by react hook form
  onChange={controller.field.onChange}
	// same with on blur
  onBlur={controller.field.onBlur}
  name={controller.field.name}
  value={controller.field.value}
  ref={controller.field.ref}
  error={!!controller.fieldState.error}
	// displaying error message
  helperText={controller.fieldState.error?.message}
/>
4. Now we have TextInput ready:
import React from 'react';
import { TextField } from '@mui/material';
import {
  useController,
  UseControllerReturn,
  useFormContext,
} from 'react-hook-form';

export interface InputProps {
  name: string;
  placeholder?: string;
  label?: string;
}

export const TextInput = (props: InputProps) => {
  const { control } = useFormContext();

  const controller: UseControllerReturn = useController({
    name: props.name,
    control,
  });

  return (
		<FormControl fullWidth>
	    <TextField
	      variant="outlined"
	      placeholder={props.placeholder}
	      label={props.label}
	      onChange={controller.field.onChange}
	      onBlur={controller.field.onBlur}
	      name={controller.field.name}
	      value={controller.field.value}
	      ref={controller.field.ref}
	      error={!!controller.fieldState.error}
	      helperText={controller.fieldState.error?.message}
	    />
		</FormControl>
  );
};
Getting along with the SelectInput component
Let’s create components/SelectInput.tsx and do something similar to what we did previously with the TextInput component:
import React from 'react';
import { FormControl, InputLabel, MenuItem, Select } from '@mui/material';
import {
  useController,
  UseControllerReturn,
  useFormContext,
} from 'react-hook-form';
import { InputProps } from './TextInput';

export interface SelectInputOption {
  value: string;
  title: string;
}

export interface SelectInputProps extends InputProps {
  options: SelectInputOption[];
}

export const SelectInput = (props: SelectInputProps) => {
  const { control } = useFormContext();

  const controller: UseControllerReturn = useController({
    name: props.name,
    control,
  });

  return (
    <FormControl fullWidth>
      <InputLabel>{props.label}</InputLabel>
      <Select
        variant="outlined"
        id={props.name}
        label={props.label}
        placeholder={props.placeholder}
        onChange={controller.field.onChange}
        onBlur={controller.field.onBlur}
        name={controller.field.name}
        value={controller.field.value}
        ref={controller.field.ref}
      >
        {props.options.map((option: SelectInputOption) => (
          <MenuItem key={option.value} value={option.value}>
            {option.title}
          </MenuItem>
        ))}
      </Select>
    </FormControl>
  );
};
Integrating the DateInput component
This stage takes a whole process to proceed.
- For starters, let’s install some dependencies:
npm i @mui/lab dayjs
2. Create components/DateInput.tsx and make some imports:
import React from 'react';
import { FormControl } from '@mui/material';
import TextField from '@mui/material/TextField';
import {
  useController,
  UseControllerReturn,
  useFormContext,
} from 'react-hook-form';
import { InputProps } from './TextInput';

// Imports related to DatePicker:
// You can choose other adapters like MomentJs or DateFns,
// but don't forget to install the correcponding package before
import AdapterDayjs from '@mui/lab/AdapterDayjs';
import LocalizationProvider from 'mui/lab/LocalizationProvider';
import DatePicker from '@mui/lab/DatePicker';
3. Implement Datepicker:
  <LocalizationProvider dateAdapter={AdapterDayjs}>
    <DatePicker
      label={props.label}
      value={controller.field.value}
      onChange={controller.field.onChange}
      renderInput={(params) => (
        <FormControl fullWidth>
          <TextField
            {...params}
            error={!!controller.fieldState.error}
            helperText={controller.fieldState.error?.message}
          />
        </FormControl>
      )}
    />
  </LocalizationProvider>
4. Now, insert the final component code:
import React from 'react';
import { FormControl } from '@mui/material';
import TextField from '@mui/material/TextField';
import {
  useController,
  UseControllerReturn,
  useFormContext,
} from 'react-hook-form';
import { InputProps } from './TextInput';
import AdapterDayjs from '@mui/lab/AdapterDayjs';
import LocalizationProvider from 'mui/lab/LocalizationProvider';
import DatePicker from '@mui/lab/DatePicker';

export const DateInput = (props: InputProps) => {
  const { control } = useFormContext();

  const controller: UseControllerReturn = useController({
    name: props.name,
    control,
  });

  return (
    <LocalizationProvider dateAdapter={AdapterDayjs}>
      <DatePicker
        label={props.label}
        value={controller.field.value}
        onChange={controller.field.onChange}
        renderInput={(params) => (
          <FormControl fullWidth>
            <TextField
              {...params}
              error={!!controller.fieldState.error}
              helperText={controller.fieldState.error?.message}
            />
          </FormControl>
        )}
      />
    </LocalizationProvider>
  );
};
Establishing the CheckboxInput component
Basically, this part is nothing special and will look like this:
import React from 'react';
import { Checkbox,FormControl, FormControlLabel } from '@mui/material';
import {
  useController,
  UseControllerReturn,
  useFormContext,
} from 'react-hook-form';
import { InputProps } from './TextInput';

export const CheckboxInput = (props: InputProps) => {
  const { control } = useFormContext();

  const controller: UseControllerReturn = useController({
    name: props.name,
    control,
  });

  return (
    <FormControl fullWidth>
      <FormControlLabel
        label={props.label}
        control={
          <Checkbox
            onChange={controller.field.onChange}
            onBlur={controller.field.onBlur}
            name={controller.field.name}
            value={controller.field.value}
            ref={controller.field.ref}
          />
        }
      />
    </FormControl>
  );
};
Use newly created inputs
Now let’s apply what we’ve just created, step by step.
First, implement components/AppointmentBaseForm.tsx:
import React from 'react';
import { AppointmentPlan } from '../models';
import { TextInput } from './TextInput';
import { SelectInput, SelectInputOption } from './SelectInput';
import { DateInput } from './DateInput';

const planOptions: SelectInputOption[] = [
  {
    title: 'Basic plan',
    value: AppointmentPlan.Basic,
  },
  {
    title: 'Premium plan',
    value: AppointmentPlan.Premium,
  },
];

export const AppointmentBaseForm = () => {
  return (
    <section className="grid grid-cols-2 gap-6">
      <div className="col-span-2">
        <TextInput name="title" label="Title*" placeholder="Enter" />
      </div>
      <div className="col-span-1">
        <DateInput name="date" label="Date*" placeholder="Select date" />
      </div>
      <div className="col-span-1">
        <SelectInput
          name="plan"
          label="Plan"
          placeholder="Select plan"
          options={planOptions}
        />
      </div>
    </section>
  );
};
Then, apply components/AppointmentPetForm.tsx:
import React from 'react';
import { TextInput } from './TextInput';

export const AppointmentPetForm = () => {
  return (
    <section>
      <h2 className="font-semibold my-4 text-lg">
	      Pet information
      </h2>
      <div className="grid grid-cols-2 gap-6">
        <div className="col-span-1">
          <TextInput name="pet.name" label="Name*" placeholder="Enter" />
        </div>
        <div className="col-span-1">
          <TextInput name="pet.breed" label="Breed*" placeholder="Enter" />
        </div>
        <div className="col-span-2">
          <TextInput
            name="pet.description"
            label="Description"
            placeholder="Enter"
          />
        </div>
      </div>
    </section>
  );
};
And finally, integrate components/AppointmentContactForm.tsx:
import React from 'react';
import { TextInput } from './TextInput';
import { CheckboxInput } from './CheckboxInput';

export const AppointmentContactForm = () => {
  return (
    <section>
      <h2 className="font-semibold my-4 text-lg">
	      Contact information
      </h2>
      <div className="grid grid-cols-2 gap-6">
        <div className="col-span-1">
          <TextInput
            name="contact.firstName"
            label="First name*"
            placeholder="Enter"
          />
        </div>
        <div className="col-span-1">
          <TextInput
            name="contact.lastName"
            label="Last name*"
            placeholder="Enter"
          />
        </div>
        <div className="col-span-1">
          <TextInput
            name="contact.phoneNumber"
            label="Phone number*"
            placeholder="Enter"
          />
        </div>
        <div className="col-span-1">
          <TextInput name="contact.email" label="Email*" placeholder="Enter" />
        </div>

        <div className="col-span-2">
          <CheckboxInput
            name="contact.callMeBack"
            label="Call me back to confirm my order"
          />
        </div>
      </div>
    </section>
  );
};
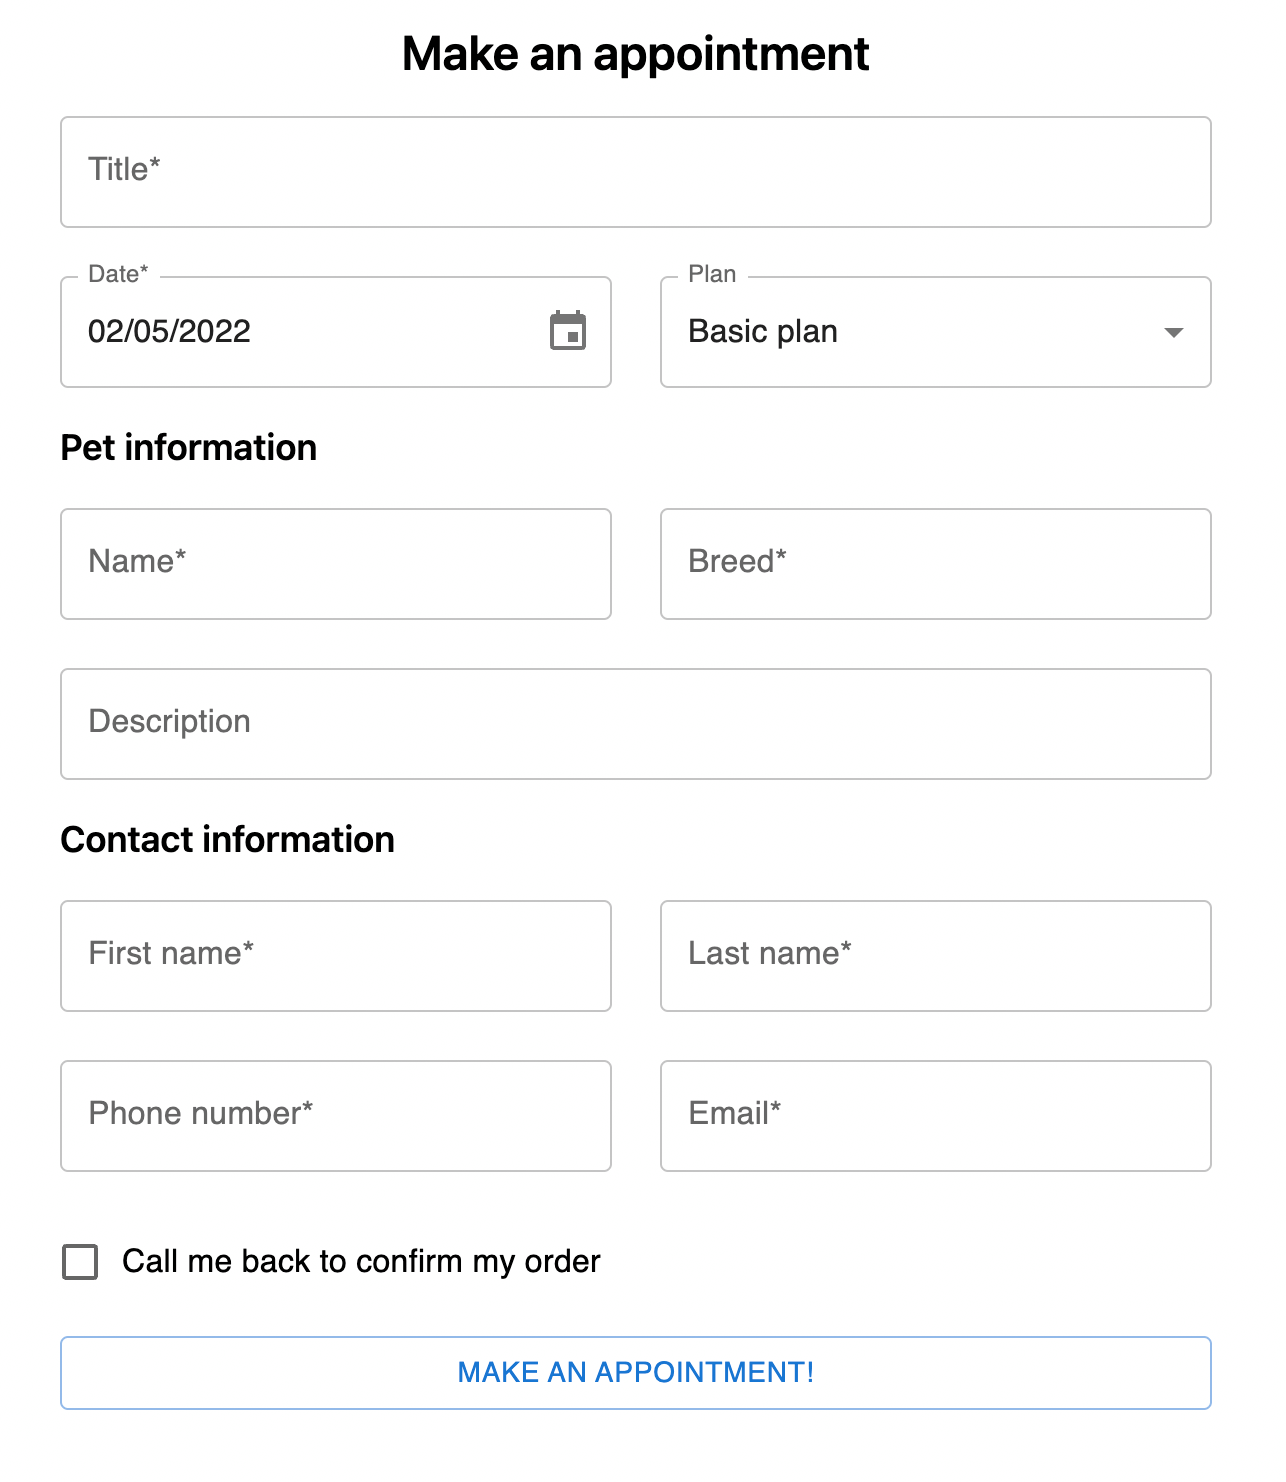
Now, our form should look like the one below:
Improving form validation
Now, let’s press the ‘Make an appointment!’ button and ensure that the validation works:
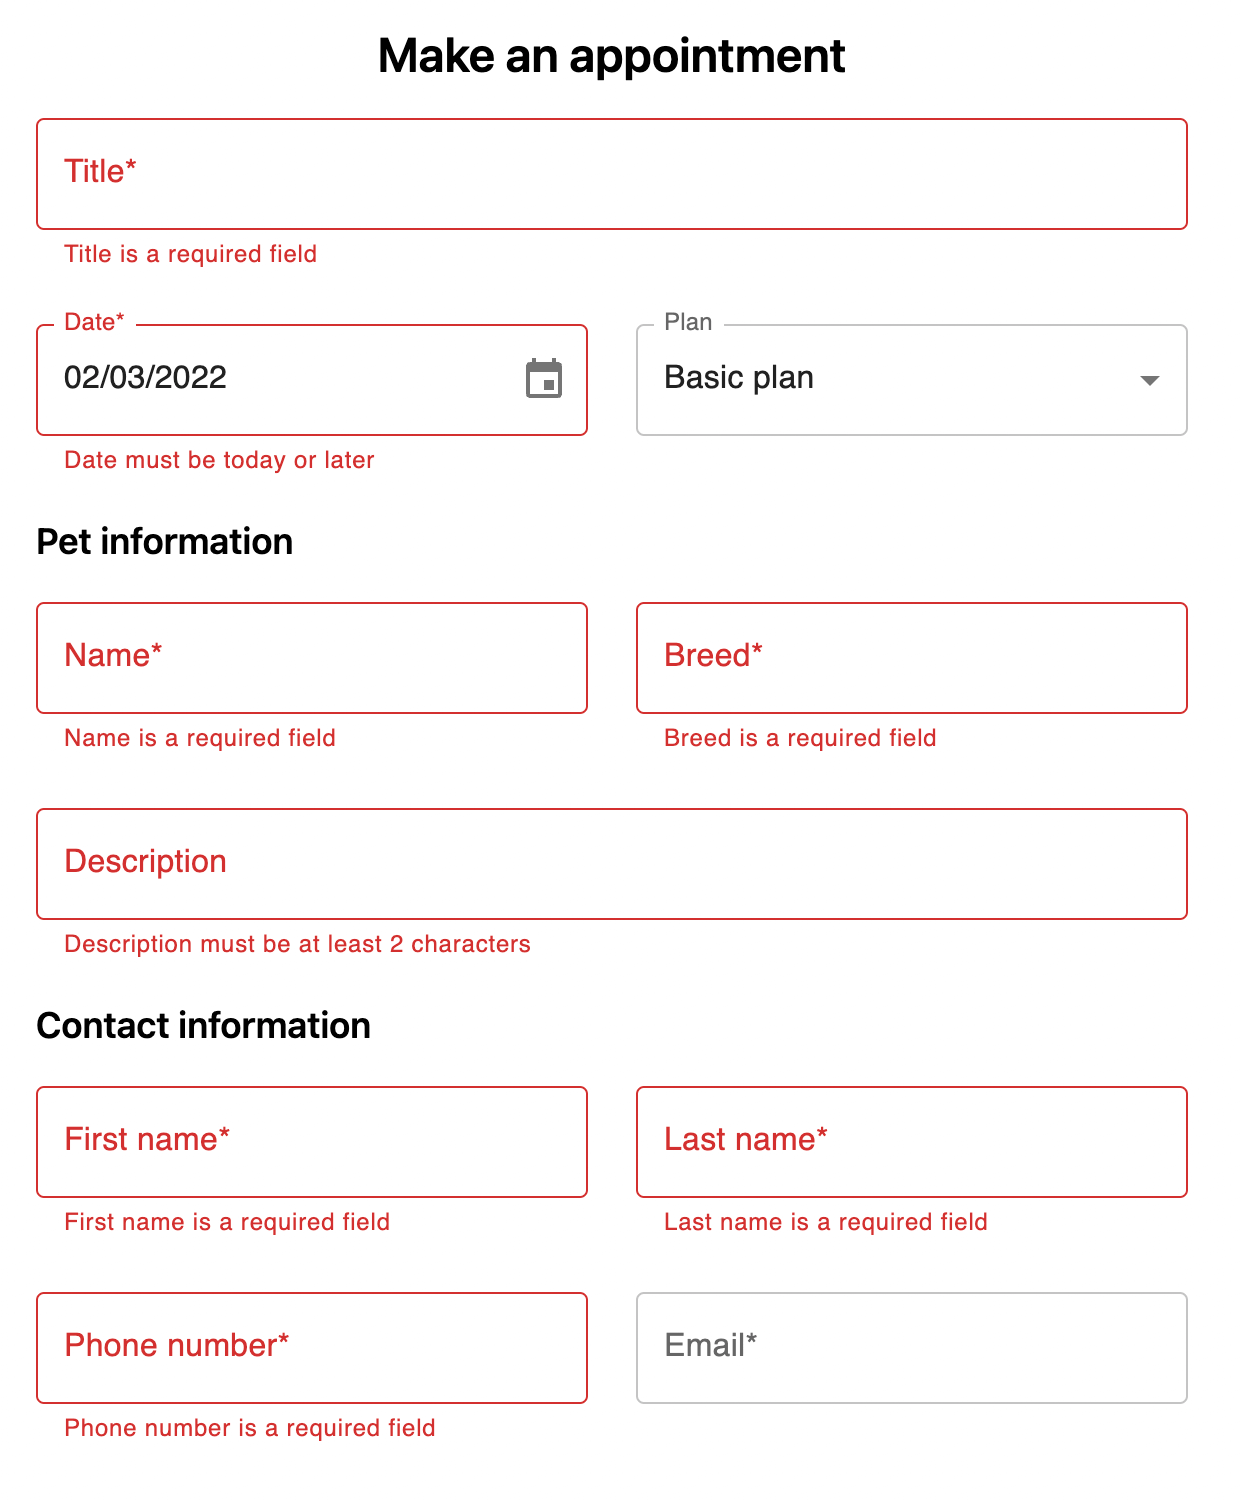
That’s almost perfect, but take a look at the error messages:
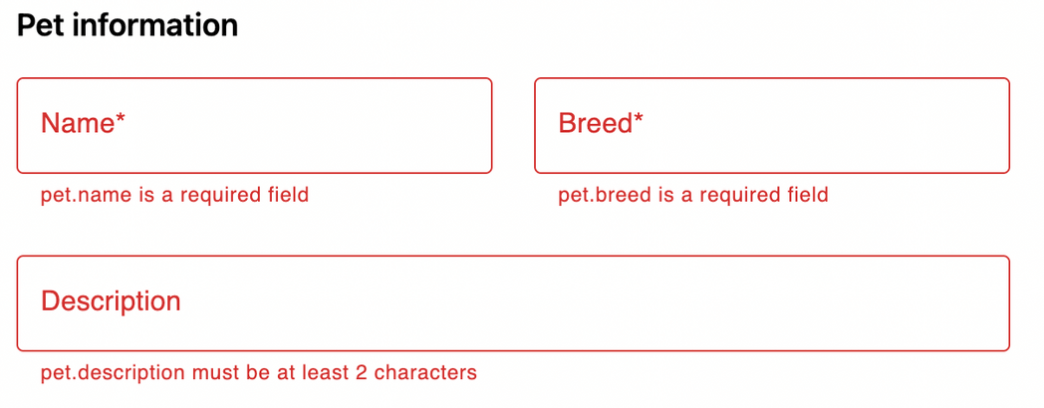
I don’t like the labels ‘pet.name’, ‘pet.breed’, and ‘pet.description’. Let’s try to fix that.
- We go to the validation.ts and add label to our fields to solve this problem:
pet: yup.object({
  name: yup.string().required().min(2).max(120).label('Name'),
  breed: yup.string().required().min(2).max(120).label('Breed'),
  description: yup.string().min(2).max(120).label('Description'),
}),
2. Do the same for the contact fields:
contact: yup.object({
  firstName: yup.string().required().min(2).max(120).label('First name'),
  lastName: yup.string().required().min(2).max(120).label('Last name'),
  phoneNumber: yup.string().required().phone().label('Phone number'),
  email: yup.string().email().label('Email'),
  callMeBack: yup.boolean().required().label('Callback'),
}),
3. And for the rest of the fields, just capitalize to make it all consistent:
title: yup.string().required().min(2).max(120).label('Title'),
date: yup.date().required().min(today).label('Date'),
plan: yup
  .string()
  .oneOf([AppointmentPlan.Basic, AppointmentPlan.Premium])
  .required().label('Plan')
4. Save, run, and submit the form again:
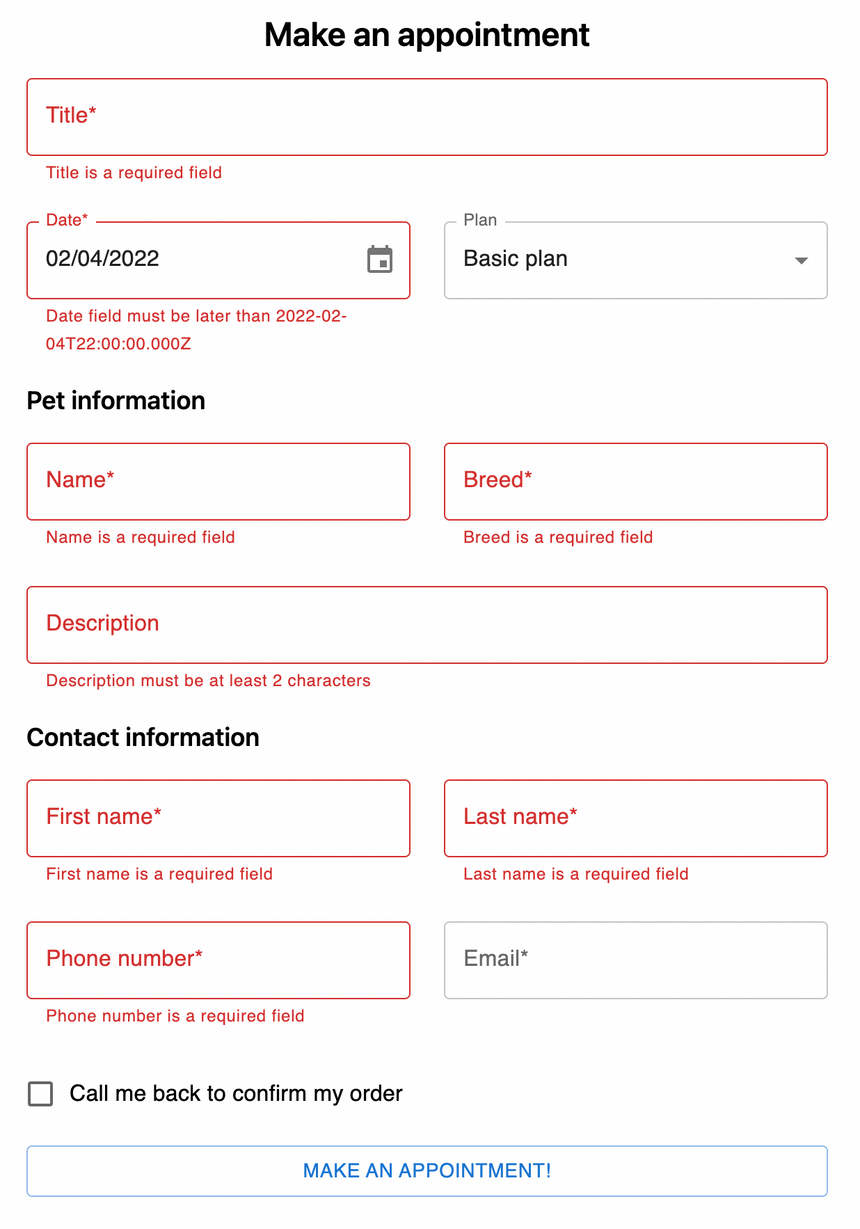
Looks awesome. Now there’s just one last thing left to do: let’s make the error message for the date more human-readable. Let’s make it say, “Date must be today or later.” To do that, just go back to validation.ts again and modify it slightly:
date: yup
    .date()
    .required()
    .min(today, 'Date must be today or later')
		.label('Date')
We can set our custom validation message for each validation rule, for example:
yup.date().required('The date is required!')
Now let’s do a final check:

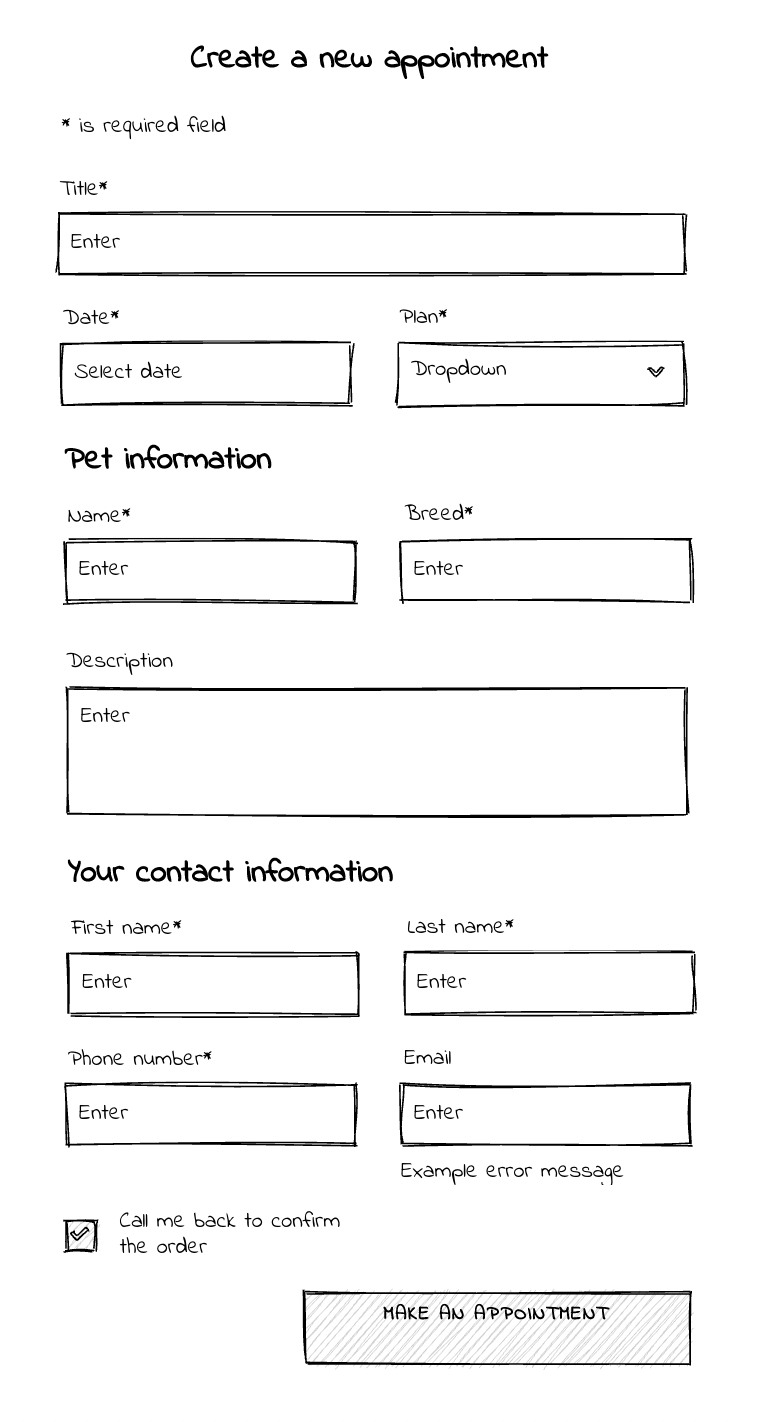
Everything works great! We’ve finalized the form and turned our wireframe into the actual working form:

And finally, our AppointmentForm.tsx has the following code:
import React from 'react';
import {
  useForm,
  UseFormProps,
  UseFormReturn,
  FormProvider,
} from 'react-hook-form';
import { Appointment, AppointmentPlan } from '../models';
import { AppointmentBaseForm } from './AppointmentBaseForm';
import { AppointmentPetForm } from './AppointmentPetForm';
import { AppointmentContactForm } from './AppointmentContactForm';
import { yupResolver } from '@hookform/resolvers/yup';
import { validationSchema } from '../validation';
import { Button } from '@mui/material';

const defaultValues: Appointment = {
  title: '',
  date: newDate().toString(),
  plan: AppointmentPlan.Basic,
  contact: {
    firstName: '',
    lastName: '',
    email: '',
    phoneNumber: '',
    callMeBack: false,
  },
  pet: {
    name: '',
    breed: '',
    description: '',
  },
};

export const AppointmentForm = () => {
  const form: UseFormReturn<Appointment, UseFormProps> = useForm<Appointment>({
    defaultValues,
    resolver: yupResolver(validationSchema),
  });

  const submitForm = (form: Appointment) => {
		// todo: do whathever after submitting
  };

  return (
    <FormProvider {...form}>
      <form onSubmit={form.handleSubmit(submitForm)}>
        <h1 className="font-semibold my-4 text-2xl text-center">
          Make an appointment
        </h1>

        <AppointmentBaseForm />
        <AppointmentPetForm />
        <AppointmentContactForm />

        <Button type="submit" variant="outlined" fullWidth className="mt-4">
          Make an appointment!
        </Button>
      </form>
      {/*<DevTool control={form.control} /> */}
    </FormProvider>
  );
};


