От халепа... Ця сторінка ще не має українського перекладу, але ми вже над цим працюємо!

Underwater Photo Color Correction in Swift: How We Built It

Dmytro Mashtaler
/
iOS developer
•
20 min read
Share:


Share:
•
20 min read
By Dmytro Mashtaler, iOS Developer
NERDZ LAB · Engineering · July 2026
Every underwater photo comes out of the water looking wrong. The blues are too heavy, the reds are gone, and the reef that looked vivid to your eyes shows up on screen as a flat blue-green smear. This is the story of how one of our iOS engineers built an algorithm that fixes that in a single tap — and why the obvious fixes all fail. It gets technical in places, but each dense section is followed by a plain-English recap, so you can read it at whatever depth you like.
Article content
Context: What I Was Actually Building
The Problem: Water Eats Your Red Channel
What I Tried First (Dead Ends Worth Sharing)
Stage 1: The Auto-Correction Algorithm
Stage 2: The Metal Post-Processing Pipeline
Gotchas That Cost Me Real Time

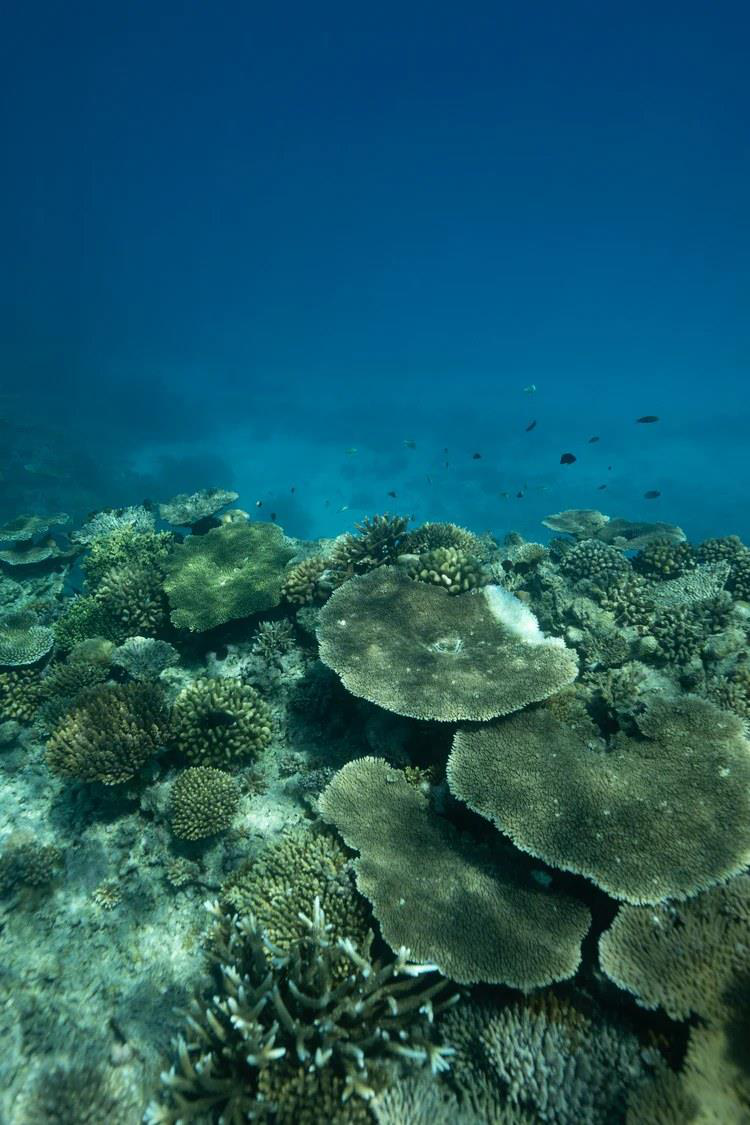 Before | 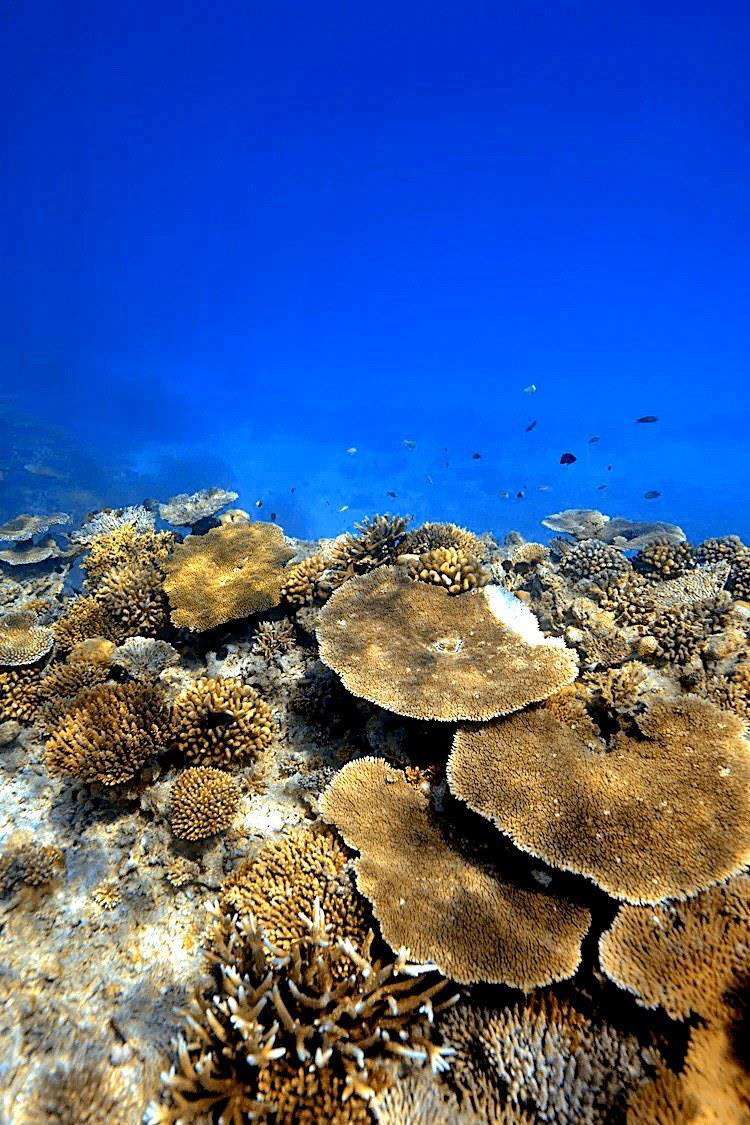 After |
The automatic pass on a reef shot from a typical recreational dive depth. No sliders, no presets — one tap.
Context: What I Was Actually Building
I spent the last several months building DiveApp — an iOS app that takes underwater photos (your own GoPro / iPhone-in-a-housing shots, or ones you imported from the camera roll) and fixes the color in one tap. Then, if the auto-fix didn’t nail it, you can drop into a manual editor and push ten sliders around until it looks right.
Constraints: small team (one iOS dev for this feature — me), the app has to run on phones going back a few generations, and processing has to feel instant. People expect the same kind of responsiveness they get from Photos or Lightroom Mobile. Anything noticeably slower than that and they assume the app is broken.
Stack: Swift, SwiftUI for the editor UI, Core Image for the auto pass, and a hand-written Metal compute shader for the manual editor. Deployment target iOS 18; tested across recent iPhone generations.
The Problem: Water Eats Your Red Channel
Underwater photography is fundamentally a color problem before it’s anything else. Water absorbs light wavelengths at very different rates: red is gone in the first 5 meters, orange and yellow follow within 10–15 meters, and below that everything looks like it was shot through a blue-green filter someone forgot to take off. Add in suspended particles (sand, plankton, your buddy’s fin kicks) and your white balance is hopeless.
In plain terms: Sunlight is a mix of colors. Water strips those colors out one at a time as you go deeper — red disappears almost immediately, which is why deep photos look blue-green. To fix the photo you have to put the missing colors back. The catch is that how much is missing changes with every shot, so there’s no single “correct” setting.
The fix in principle is well known to underwater photographers — push red back, drop blue/green, recover contrast. The fix in practice on iOS, in Swift, with public documentation, is… not great. Apple’s Core Image has CIWhitePointAdjust, CIColorControls, CITemperatureAndTint, CIColorMatrix. None of them, alone or stacked, get you to a result that actually looks like the reef looked.
There’s prior art, but it splits into two camps. The enhancement-and-dehazing family — the UCM algorithms, the classic UDCP — mostly lives in Python and C++ against OpenCV. Separately there’s the physically accurate approach: Akkaynak and Treibitz’s Sea-thru, which actually reverses what water does to light but needs a per-pixel depth map of the scene to do it (more on why that matters in the trade-offs below). Either way, there’s almost nothing native-Swift. The closest thing I found was a half-broken Objective-C port from ~2016 that no longer compiles on modern Xcode.
So I built my own. Two passes: an automatic one that does color analysis on the actual pixels and decides what to do, and a Metal post-processor for when the user wants to fine-tune.
What I Tried First (Dead Ends Worth Sharing)
Three things almost everyone reaches for first when they think “fix the underwater photo,” and the specific reason each one breaks. They’re the reason the final algorithm is shaped the way it is.
- Just bumping the temperature with CITemperatureAndTint. CITemperatureAndTint was built for daylight white-balance correction — its useful range is the kind of shift you’d apply to a tungsten-lit indoor shot. Underwater the cast is an order of magnitude stronger, and worse, it changes wildly between scenes. The same warm shift that fixes a blue-water photo turns a sandy-bottom photo orange. There is no single setting that batches.
- A fixed 3×3 color matrix tuned by eye. This is the obvious-to-a-graphics-engineer answer: pick a matrix that pushes red, drops blue, restores some warmth, apply it to every photo. It works on the photo you tuned on. It works on photos shot at the same depth, in the same water, with the same housing. Two reef trips later you discover that a Red-Sea-tuned matrix is useless in a Croatian quarry and a quarry-tuned matrix turns Red Sea photos into a sunset. A static matrix cannot adapt to the scene — the algorithm has to read the pixels first.
- Just multiplying the red channel. The temptation is overwhelming: red is missing, multiply it back. The problem is that there is essentially no red left in the input — water has absorbed it almost entirely by 5 m. Multiplying noise produces amplified noise. You get a magenta haze and grain everywhere the highlights aren’t blown out. This is exactly what the hue-shift trick further down exists to solve.
- CIWhitePointAdjust with the scene average as the reference. The classic auto-white-balance move. The math assumes there’s a real neutral somewhere in the frame to anchor to. Underwater there usually isn’t — the “average” is dominated by the water itself, so the algorithm helpfully decides the water is the white point and pushes everything else further away from neutral. It boosts whichever channel is already winning, which underwater means more blue or more green, which is the opposite of what you wanted.
In plain terms: Every quick fix fails for the same underlying reason: it treats all underwater photos the same. But blue tropical water and murky green quarry water need opposite corrections, and no fixed recipe can tell them apart. The breakthrough was to make the software look at each photo first and then decide what to do — the rest of this article is how that decision gets made.
The thread connecting all four failures: none of them look at what kind of underwater scene the photo actually is. The unlock was building the algorithm around adaptive scene analysis, not around any single fix.

The Solution, at a Glance
Two components, behind two protocols (so the editor view model doesn’t care which one it’s talking to):
protocol ImageCorrectorType {
    func correctImage(_ image: UIImage) async -> UIImage?
}

protocol MetalImageCorrectorType {
    func correctImage(_ image: UIImage,
with params: MetalCorrectionParams)
        async -> UIImage?
}
ImageCorrector is the auto pass — it reads pixels, decides what kind of water you’re in, builds a CIColorMatrix on the fly, applies it once on the GPU through Core Image. MetalImageCorrector is the manual pass — a small compute kernel with ten exposed parameters that the slider UI binds to.
In plain terms: There are two engines. The first one does the automatic one-tap fix. The second one powers the manual editor with its ten sliders. They’re kept behind clean “interfaces” (protocols) so the rest of the app can swap or test either one without caring how it works inside — a small design choice that pays off later in testing.
In practice the flow is: user picks a photo → we run the auto pass and show the result → if they’re happy they save, otherwise they open the editor and the auto result is the starting point for the Metal pipeline.
Stage 1: The Auto-Correction Algorithm
Downsample first. Always.
The first thing the auto pass does is shrink the image to ~256 px on the long edge for analysis. We are not correcting on this tiny image — we are computing statistics from it and then applying the resulting color matrix to the full-resolution original. The downsample makes the average-color, hue-shift, and histogram passes essentially free.
let analysisSize: CGFloat = 256
let scale = analysisSize /
max(ciImage.extent.width, ciImage.extent.height)
let scaledImage = ciImage.transformed
(by: CGAffineTransform(scaleX: scale, y: scale))
guard let pixelData = getPixelData(from: scaledImage)
else { return nil }
On modern iPhones this brings the analysis cost on a 12 MP photo from a noticeable beach-ball into the single-digit-millisecond range. The downsample is the entire reason the rest of the algorithm — average color, histogram building, hue-shift iteration — can be written as straight Swift loops over a pixel buffer rather than as more GPU passes.
In plain terms: To decide how to fix the photo, the app doesn’t study the full 12-megapixel image — it studies a thumbnail-sized copy (about 256 pixels wide). A thumbnail has all the same color information but a tiny fraction of the pixels, so the “analysis” step is almost instant. Once it has worked out the fix, it applies that fix to the full-size photo. Decide on the cheap copy, apply to the real one.
Detect the water type
This is the part I couldn’t find in any Swift example, and the one that made the biggest visual difference. Before doing anything else, we look at the average RGB and ask: is this blue water or green water? Different waters need different corrections — in particular, green water has a stronger green cast than just “missing red,” and you have to mix some of that green back into blue or the result looks sickly.
let greenBlueRatio = avg.green / max(avg.blue, 1.0)
let greenRedRatio  = avg.green / max(avg.red, 1.0)
let blueRedRatio   = avg.blue / max(avg.red, 1.0)

let isGreenWater = greenBlueRatio > 1.15 &&
                   greenRedRatio > 1.05 &&
                   blueRedRatio < 1.6 && avg.green > 60
Those four thresholds are the result of a lot of trial and error against a corpus of personal dive photos from three different bodies of water. They’re not magic, they’re tuned. If you swap your test set, you’ll probably retune.
In plain terms: The app compares how much green, blue, and red are in the photo and uses four simple ratio checks to answer one question: is this blue water or green water? That single decision sends the photo down a different repair path. The four cut-off numbers weren’t derived from theory — they came from testing on a real folder of dive photos until the classifier stopped getting it wrong.
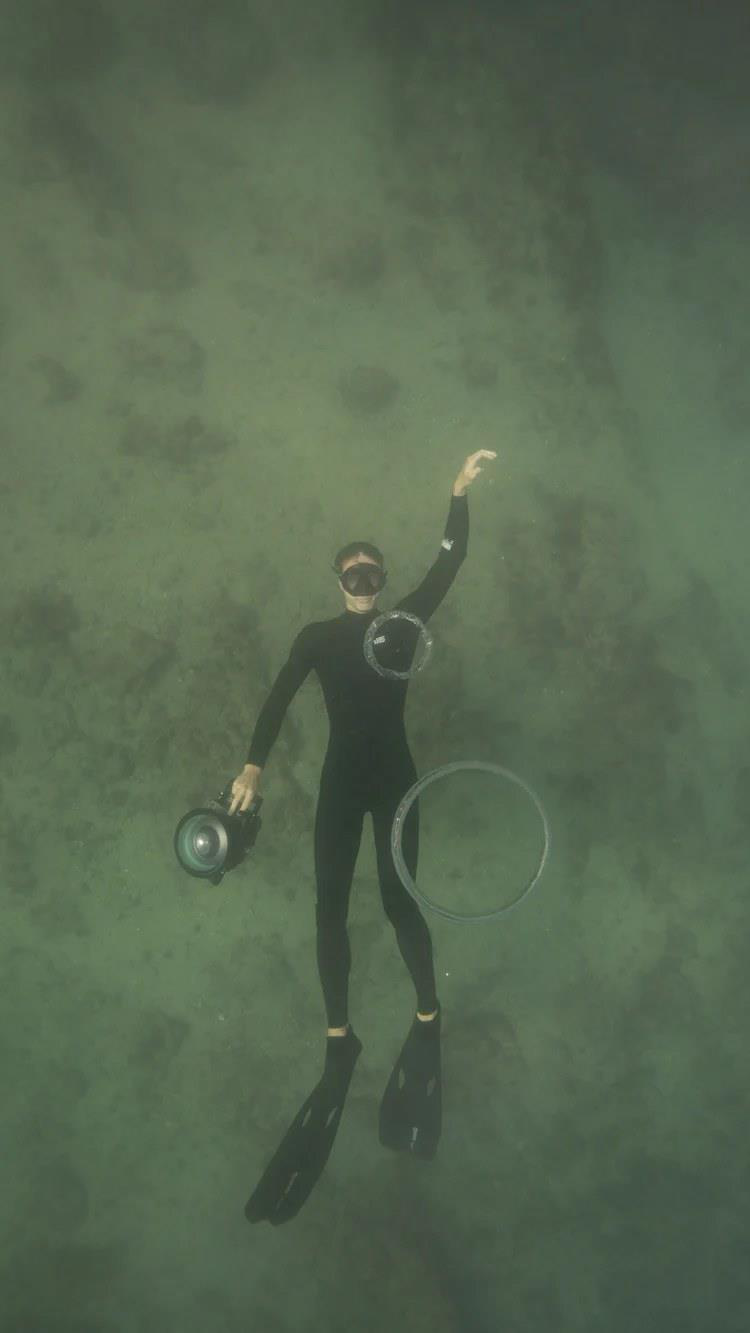 Before | 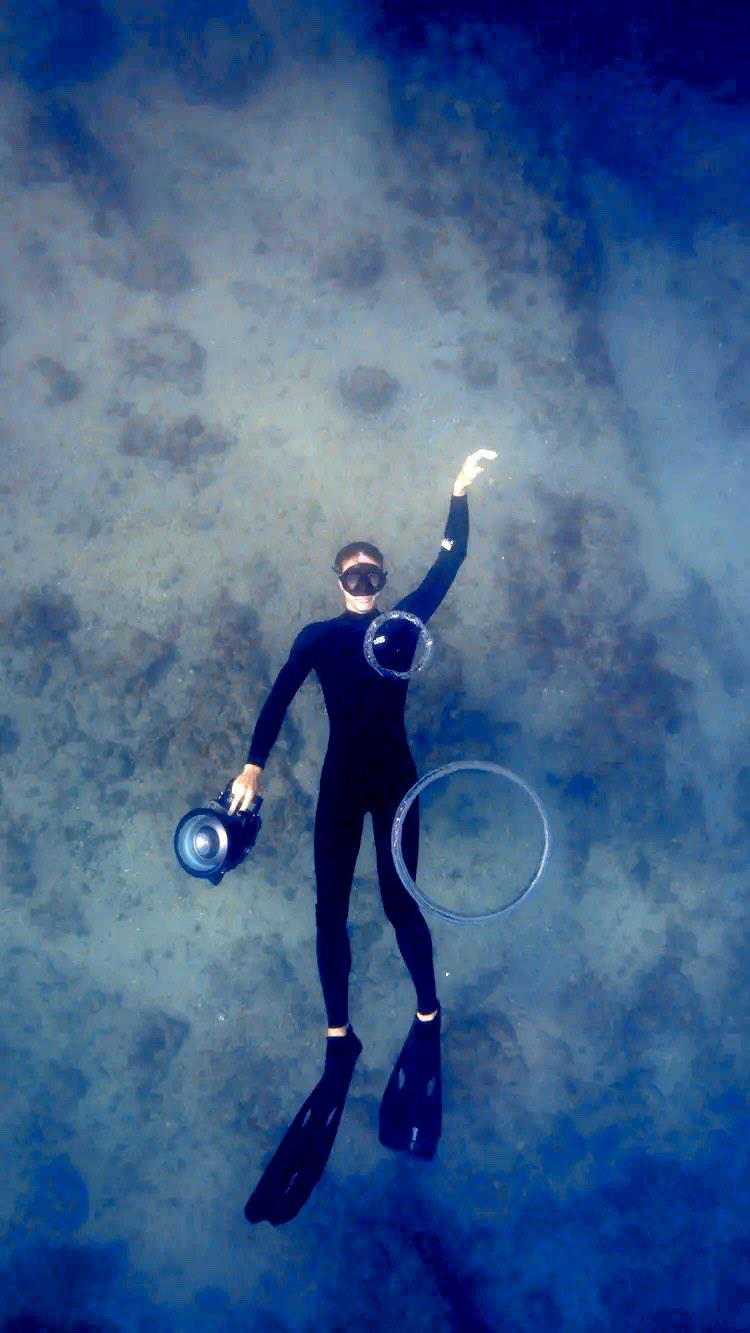 After |
Murky green water. The detector flags this as green-water, swaps in the green-water branch of the algorithm, and the result reads as actual water with a person in it.
Hue-shift to recover red
Underwater photos lose red. You can’t just multiply the red channel because there’s usually nothing left to multiply — it’s a few units above zero. What does work is rotating in YUV space (NTSC luma weights) so that a portion of the green/blue energy bleeds into red, then iterating the rotation until the recovered average red passes a sane threshold (here, 60 / 255).
private func hueShiftRed
(red: Float, green: Float, blue: Float, hue: Float) -> RGB {
    let uValue = cos(hue * .pi / 180.0)
    let wValue = sin(hue * .pi / 180.0)

    let newRed   = (0.299 + 0.701 * uValue + 0.168 * wValue) * red
    let newGreen = (0.587 - 0.587 * uValue + 0.330 * wValue) * green
    let newBlue  = (0.114 - 0.114 * uValue - 0.497 * wValue) * blue

    return RGB(red: newRed, green: newGreen, blue: newBlue)
}
I cap the hue shift at 120° for blue water and 70° for green water (green water doesn’t need as aggressive a rotation — push it too far and skin tones go magenta).
In plain terms: Since the red is basically gone, you can’t just “turn red up” — there’s nothing there to amplify except noise. Instead the app borrows a little of the leftover green and blue energy and rotates it into the red channel, the way a color wheel spins one hue toward another. It nudges that rotation step by step until there’s a believable amount of red back in the picture, and it stops sooner for green water so skin doesn’t turn pink.
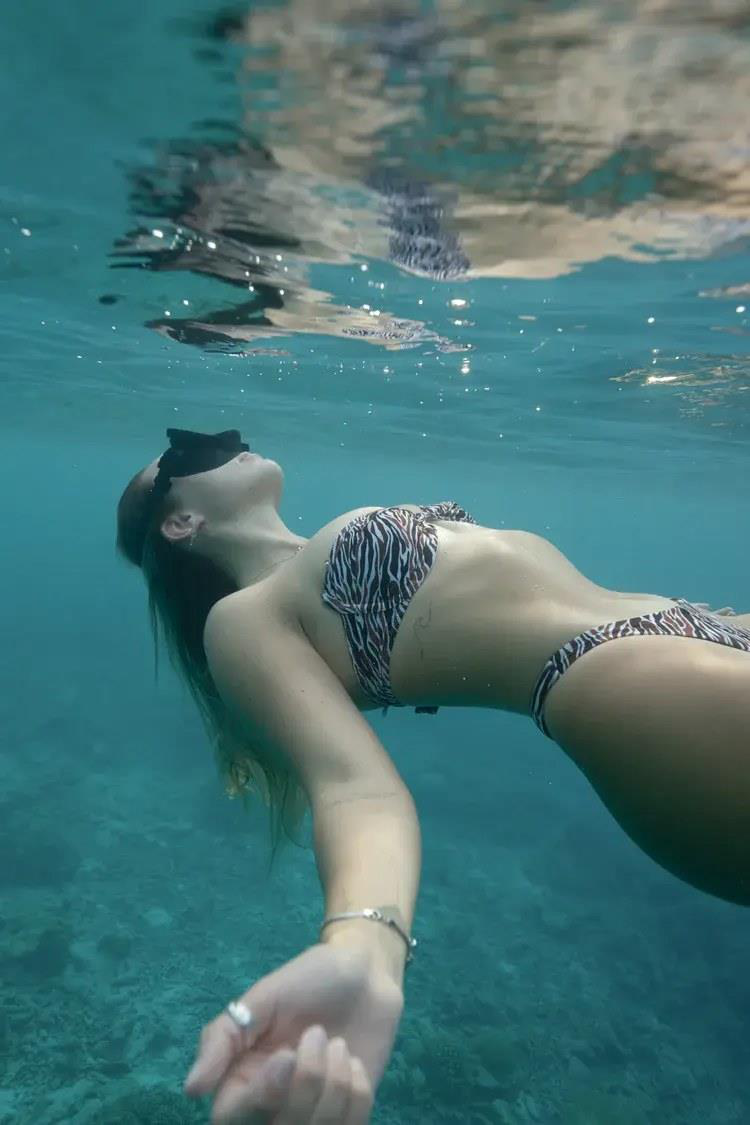 Before | 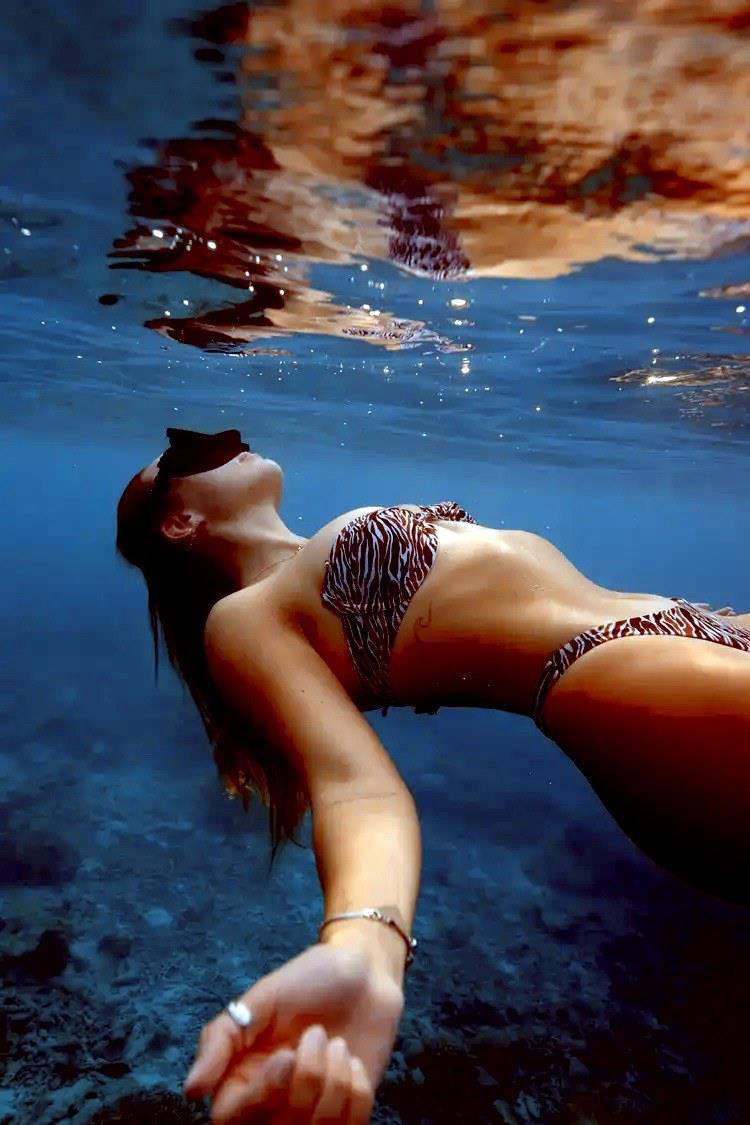 After |
Skin tones are where the hue-shift trick earns its keep. The “before” here doesn’t look that bad — until you see how much warmth was actually missing.
Histogram normalization with safety rails
After the hue shift, I build a 256-bin histogram per channel and find the widest empty region (largest gap between non-trivial bins). That gap defines the new black point and white point for that channel. Per-channel gain is then 256 / (high − low).
Two things matter here, and they are the difference between “this looks like underwater” and “this looks like a cartoon”:
- Clamp the gains. Mine are red ≤ 3.5, green ≤ 3.0, blue ≤ 3.0. Without these caps, low-key photos blow out the moment you hit a frame with deep shadows.
- Dampen the black-point shift on dark images. If the overall brightness is < 80/255 I use a low-end dampener of 0.30 instead of 0.85. Otherwise dark scenes get crushed into black.
- Floor the negative bias at −0.22. The matrix bias terms are how we shift the black point; without a floor they happily push the output negative and you get blocky shadows.
In plain terms: Once the colors are back, the photo still looks washed out because it isn’t using the full range from dark to bright. The app stretches each color to fill that range — like pulling the two ends of a rubber band. The three “safety rails” stop the stretch from going too far: cap how hard it pulls, ease off on already-dark shots, and never let a color drop below a floor. Without them, bright areas blow out and shadows turn to solid black blocks.
Green-water rescue
When isGreenWater is true I do something CIColorMatrix-tutorials never mention: I mix some of the green channel into the blue output. This is the entry in row B, column G of the matrix — normally 0. The mix amount scales with how green the water is.
if isGreenWater {
    let severity = greenBlueRatio - 1.0

    blueFromGreenMix = max(0.20, min(0.70, severity * 0.40))
    blueGain *= 1.40
    blueOffset += 0.12

    if severity > 1.8 { greenGain *= 0.92 }
    adjstRedBlue *= 0.82
}
The effect is dramatic on murky-quarry photos: instead of the result being green-with-a-bit-of-blue, you get something that reads as actually-blue water with green plants in it. Took me weeks to figure out that the answer was to inject green into blue rather than to keep fighting the green cast directly.
In plain terms: The counterintuitive trick for green water: instead of trying to remove the green, the app pours some of that green into the blue channel. The scene keeps its green plants but the water itself reads as blue again — which is what your eye expected all along. The murkier the water, the more green gets redirected into blue.
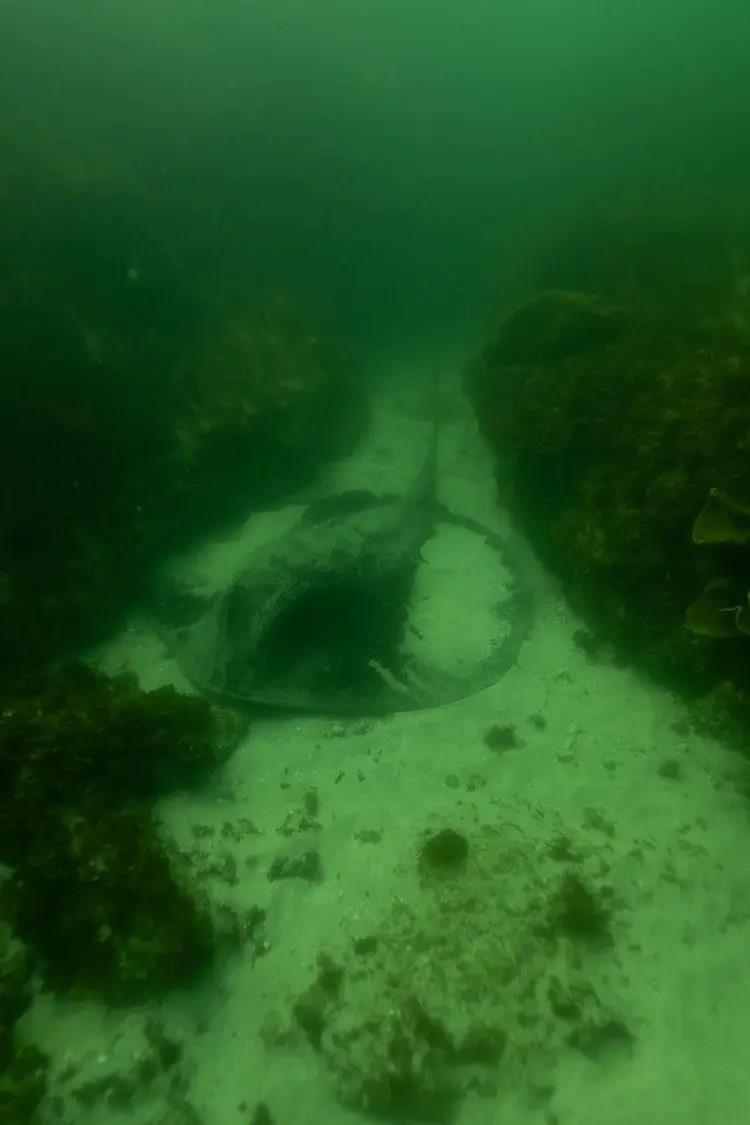 Before | 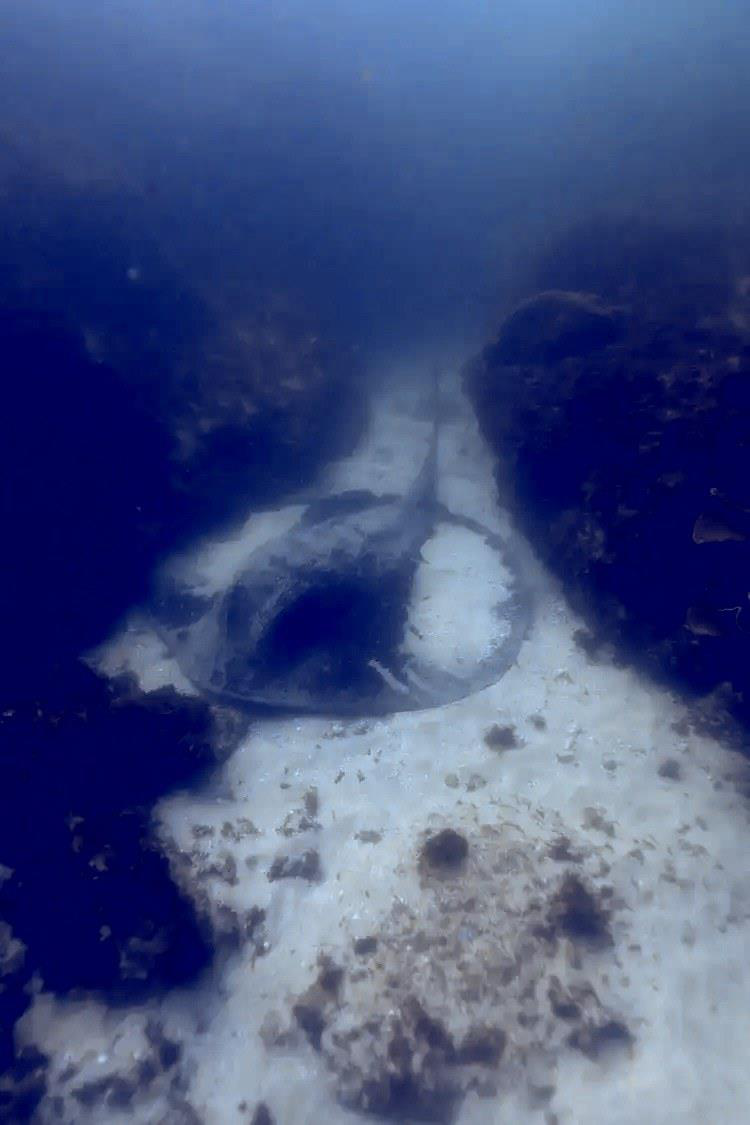 After |
Green-water rescue at work — the green-into-blue mix turns what looks like a swamp into recognisably blue water with a stingray on a sandy bottom.
One matrix, one GPU pass
All of the above produces a single 4×5 color matrix that I hand to CIColorMatrix. Core Image does it on the GPU and the entire correction — analysis plus apply — finishes well under the threshold where a user perceives a delay.
One honest limitation lives in that word single. Sea-thru’s central result is that attenuation depends on distance — an object far from the camera has lost more color than a near one, and a physically correct fix would correct them by different amounts. A single matrix applied to the whole frame can’t do that; it picks one correction for everything. With a depth map I could vary the correction by range, but without one this is the deliberate trade: a uniform global fix that’s right for the bulk of the frame, in exchange for speed, simplicity, and working on any photo a user throws at it.
In plain terms: Every decision above gets folded into one compact set of instructions — a color matrix — that the phone’s graphics chip applies to the whole photo in one fast step. The honest limitation: it applies the same correction everywhere, even though distant parts of the scene actually lost more color than nearby parts. Correcting that properly would require knowing the distance to every object, which a single JPEG can’t tell you. So it’s a deliberate trade of perfect physics for speed and “works on any photo.”
End-to-end — load the photo, downsample, analyse, build the matrix, apply at full resolution, render back to a UIImage — the auto pass stays well under the threshold where users start wondering if the app froze. Anything in the low hundreds of milliseconds on a typical 12 MP shot reads as instant.

Stage 2: The Metal Post-Processing Pipeline
The auto pass is right ~80% of the time on photos from my own dive trips. The other 20% — plus everyone who has Strong Opinions about how a reef should look — needs a manual editor. That’s what the Metal pass is for.
I went with Metal rather than another Core Image filter chain for two reasons. First, a single compute kernel is easier to reason about than a graph of chained CIFilters once you have more than three or four user-controllable parameters. Second, I wanted the entire pipeline in one .metal source string so I could iterate the math without rebuilding a custom CIKernel each time.
In plain terms: The one-tap fix is good enough about four times out of five. For the rest — and for people who want the reef to look exactly their way — there’s a manual editor with ten sliders. It’s built on Metal, Apple’s low-level graphics technology, because once you have this many live controls, one small purpose-built program is easier to manage and tweak than a long chain of stock filters.
The kernel exposes ten parameters — enough to do real grading, few enough to fit in a single editor screen:
- gammaR, gammaG, gammaB — per-channel gamma applied first. Defaults: 1.20 / 1.00 / 0.961.
- gbCrosstalk, rbCrosstalk, rgCrosstalk — additive cross-channel mixing for the cyan / magenta / yellow axes. Defaults: 0.364 / −0.023 / −0.396.
- postGamma — global gamma applied after the crosstalk. Default: 0.791.
- postContrast, postPivot — contrast applied around a pivot, not just (x − 0.5). Defaults: 1.07 / 0.435.
- postSaturation — saturation against a Rec.709-luma neutral. Default: 1.10.
The reason for the weird-looking non-1.0 defaults is exactly the same as the auto pass’ thresholds — these are the values that produced the best result on my reference dive set. They are deliberately small offsets so the editor opens on something already-tasteful, not on “identity matrix.”
In plain terms: The ten sliders cover brightness curves, subtle color mixing, contrast, and saturation — the same knobs a pro would reach for. The oddly specific default values (0.791, 0.435, and so on) aren’t random: they’re the settings that looked best across the reference photos, so the editor opens on a good-looking starting point instead of a do-nothing neutral one.
The kernel itself is short — about 30 useful lines including the boilerplate guards:
kernel void processImage(
    texture2d<float, access::read>  input  [[texture(0)]],
    texture2d<float, access::write> output [[texture(1)]],
    constant float *params [[buffer(0)]],
    uint2 gid [[thread_position_in_grid]]
) {
    if (gid.x >= input.get_width() ||
gid.y >= input.get_height()) return;

    float4 c = input.read(gid);

    float invGR = 1.0 / max(params[0], 0.001);
    float invGG = 1.0 / max(params[1], 0.001);
    float invGB = 1.0 / max(params[2], 0.001);
    float invPG = 1.0 / max(params[6], 0.001);

    float gr = pow(c.r, invGR),
gg = pow(c.g, invGG), gb = pow(c.b, invGB);

    float r = gr + (gg - gb) * params[3];
    float g = gg + (gb - gr) * params[4];
    float b = gb + (gr - gg) * params[5];

    r = pow(max(r, 0.0), invPG);
g = pow(max(g, 0.0), invPG); b = pow(max(b, 0.0), invPG);

    r = params[8] + (r - params[8]) * params[7]; //
contrast around pivot
    g = params[8] + (g - params[8]) * params[7];
    b = params[8] + (b - params[8]) * params[7];

    float luma = r * 0.2126 + g * 0.7152 + b * 0.0722;

    r = luma + (r - luma) * params[9]; // saturation
    g = luma + (g - luma) * params[9];
    b = luma + (b - luma) * params[9];

    output.write(float4(r, g, b, c.a), gid);
}
On the Swift side I dispatch with 16×16 threadgroups, which I landed on early and never had reason to change. The conventional wisdom for Apple GPUs is to query threadExecutionWidth and aim for a multiple of it; for the kernel above that lands at 16×16 on every device I tested.
In plain terms: This little program runs once for every pixel, all in parallel on the GPU, which is why the sliders feel instant even on a big photo. The “16×16 threadgroups” line is just how the work is chunked up so the graphics chip stays busy and efficient.

Gotchas That Cost Me Real Time
In plain terms: These are the small, maddening bugs that don’t show up in any tutorial — the kind that eat a day each. They’re here so the next person doesn’t lose the same days.
- EXIF orientation. Photos from the camera roll come in with rotation bits set in EXIF, but the underlying CGImage data is in the original sensor orientation. If you don’t normalize first you will process pixels that look right on screen but are sideways in memory — statistics and matrix application work on the unrotated buffer. I have a
UIImage+FixedOrientationextension that I call before anything else. - CoreGraphics y-flip on Metal upload/download. CoreGraphics origin is bottom-left, Metal textures (as I use them) are top-left. I flip on upload (
context.scaleBy(x: 1, y: -1)) and again on download with an explicit row-by-row swap. Without the second flip the output texture renders upside down and you spend an hour blaming the kernel. - CIColorMatrix bias vector ordering. It is the 5th column of the 4×5 matrix, but Apple’s API takes it as a separate
inputBiasVectorbuilt from elements 4/9/14/19, not 16/17/18/19. The docs are vague enough that I had this wrong for a day. - CIContext with the software renderer is a trap. Always construct it with
.useSoftwareRenderer: false. On some Simulator configurations it silently falls back to CPU and your auto pass goes from ~150 ms to multiple seconds. - Histogram threshold is per-pixel-count, not absolute. I express it as
Float(numOfPixels) / 2000so the algorithm behaves the same on a 256-px analysis image as on a hypothetical 1024-px one. Hardcoding an absolute bin threshold was the first version and it broke the moment I changed the downsample size.
Trade-Offs I Made on Purpose
I picked Core Image for the auto pass and Metal for the editor on purpose. Core Image’s CIColorMatrix is genuinely the right tool for “apply a fixed linear transform to every pixel exactly once” and Apple has already optimized that path far harder than I will. But Core Image’s ergonomics break down when you want a runtime-tunable, multi-stage non-linear pipeline with cross-channel feedback. That’s a 30-line Metal kernel, not a CIFilter graph.
The bigger omission, for anyone who knows this field, is a physically-based model — and the one to name is Sea-thru (Akkaynak and Treibitz, 2019), the paper that got underwater color recovery physically right. It throws out the borrowed-from-fog haze model in favor of one derived for water, and shows two things older methods missed: backscatter and the attenuated scene are governed by different coefficients, and attenuation isn’t uniform — it depends on how far each object is from the camera.
The results are genuinely accurate. The catch is the input: Sea-thru needs an RGBD image — a per-pixel depth map, recovered from structure-from-motion or a stereo rig. I’m handed a single JPEG from a GoPro or someone’s camera roll, with no depth channel and no second view, so the whole physical-recovery pipeline is off the table before I write a line of it. That constraint is the reason the auto pass is shaped the way it is: I have color statistics but no scene geometry, so a global, scene-adaptive color matrix isn’t a compromise — it’s the right tool for the input I actually get.
I also intentionally did not go for a learned model. Underwater enhancement networks (UWCNN and its descendants) exist, and on the hardest 5% of scenes — deep-blue silhouettes, schools of fish against open water — they can beat a hand-tuned algorithm. But the cost is real: tens of megabytes added to the binary, hundreds of milliseconds to seconds per inference, and occasional confident hallucinations that don’t look like the photo you took. For a tool people use on hundreds of photos at a time, a deterministic algorithm that you can read and tune wins over a black box that is “better on average.”
In plain terms: There are two “better” approaches that this project deliberately skipped. One (Sea-thru) is more physically accurate but needs to know the distance to every object in the shot — information a single phone photo simply doesn’t contain. The other (an AI model) can win on the hardest handful of images but bloats the app, runs slower, and occasionally invents detail that wasn’t there. For a tool people run on hundreds of photos, a fast, predictable method you can actually inspect beat both.

Opinions
- Underwater color correction is mostly a statistics problem and a tiny bit of a graphics problem. The math is high-school linear algebra. The reason it’s hard is that no single set of constants works for every scene, so the algorithm has to look at the scene before deciding what to do.
- Core Image is underrated for this kind of work. Everyone reaches for Metal first because it sounds more serious. For one-shot linear transforms, CIColorMatrix is faster to write, faster to ship, and the same speed at runtime.
- Metal is underrated for parameterized editors. The mental model — “my kernel takes a buffer of floats, the UI binds sliders to those floats” — is so much cleaner than chaining filters with intermediate textures that I would never go back to Core Image for an editor screen with more than three knobs.
- Almost every “underwater photo fix” blog post in Swift is just temperature + tint. Don’t do that. Detect the water type and adapt, or accept that half your output will look wrong.
Takeaways (What I’d Tell Myself Before Starting)
- Build the auto pass and the manual pass as two separate components behind two protocols. Mine are
ImageCorrectorTypeandMetalImageCorrectorType, injected through a simple DI container. It made testing trivial (mock both, drive the view model in isolation). - Do all analysis on a 256-px downsample, then apply the resulting transform to the original. This pattern — “decide cheap, apply on full-res” — is the single biggest performance win in the whole pipeline.
- Tune constants on a real corpus, not on three sample photos from Google. Mine came from a folder of personal dive photos. The
greenBlueRatio > 1.15threshold is not a universal truth — it’s an artifact of that corpus, and if you tune yours on a different set you should expect different numbers. - Always clamp your gains and floor your biases. The single most common visual failure of color-matrix correction is blowing highlights or crushing shadows on the edge-case frames.
- If you go the Metal route for the editor: build the kernel once, bind a flat float buffer for parameters, and keep the kernel small. Ten well-chosen parameters beat thirty mediocre ones.

Why We Share Work Like This
This kind of problem — no ready-made API, sparse documentation, a hard performance budget, and a result that has to look right to a human eye — is the everyday reality of the mobile work we do at NERDZ LAB. There was no library to install here. Getting to a one-tap fix meant reading the actual pixels, understanding the physics of how water absorbs light, and making deliberate engineering trade-offs about speed, accuracy, and app size. That judgment is exactly what an experienced iOS engineer brings to a product, and it is not something you can shortcut.
We build iOS, Android, and Flutter apps this way across healthcare, EdTech, and marketplace products — including an app with 2M+ downloads and an Apple App of the Day feature. If you have a mobile product with a hard technical problem at its core, that is the kind of work we like most.
See our mobile development services
Frequently Asked Questions
Why can’t Apple’s built-in Core Image filters fix underwater color casts?
CIWhitePointAdjust, CIColorControls, and CITemperatureAndTint were all built for shifts far smaller than what water does to light. CITemperatureAndTint’s useful range covers something like a tungsten-lit indoor shot, not a cast an order of magnitude stronger that also changes completely between a blue reef and a green quarry. Stacking these filters doesn’t fix that — the underlying assumption that a single correction works across scenes is wrong to begin with.
Why not just multiply the red channel to compensate for what water absorbs?
Because by about 5 meters depth there’s almost no red left to multiply — it’s a few units above zero. Multiplying a near-empty channel mostly amplifies sensor noise, producing a magenta haze and visible grain wherever highlights aren’t already blown out. The fix that actually works is rotating some of the remaining green and blue energy into red in YUV space, then iterating that rotation until the recovered average red crosses a sane threshold.
How does the app decide whether a photo is “blue water” or “green water”?
It computes three ratios from the average RGB of a downsampled copy of the image — green-to-blue, green-to-red, and blue-to-red — and checks them against four thresholds tuned on a corpus of real dive photos (for example, a green-to-blue ratio above 1.15). That single classification decides which correction branch the rest of the algorithm takes, since blue water and green water need different, sometimes opposite, fixes.
Why use Core Image for the automatic pass but Metal for the manual editor?
Core Image’s CIColorMatrix is an already-optimized, GPU-accelerated way to apply one fixed linear transform per pixel, which is exactly what the one-tap auto pass needs. The manual editor is a different problem: a runtime-tunable, multi-stage pipeline with cross-channel feedback across ten live parameters. That’s a better fit for a small, purpose-built Metal compute kernel than for a chain of CIFilters with intermediate textures.
Why didn’t the app use a physically accurate model like Sea-thru, or a learned AI model?
Sea-thru is more physically correct because it accounts for attenuation varying by distance to each object, but it requires a per-pixel depth map that a single JPEG from a GoPro or camera roll simply doesn’t provide. A learned underwater-enhancement network can outperform a hand-tuned algorithm on the hardest scenes, but at the cost of a much larger app binary, slower per-photo processing, and occasional hallucinated detail. For a tool people run on hundreds of photos, a fast, deterministic, inspectable algorithm was the better trade-off.
Get more insights:
See all